We are going to add fun to your kid’s life with a catapult experiment. Do not throw the Popsicle stick next time when you buy an ice candy. It will be useful for our STEM project which includes math, engineering, physics, and play as well.
How many of you agree to my point that ‘Exploring physics is bit boring for kids’!? I guess most of them say ‘Yes’. But this time I have come up with a special activity that proves physics and STEM could be so much fun. That is nothing but ‘Making a Catapult at home’.
Catapult!! Have you wondered listening the word ‘Catapult’!? I would say, ‘Yes we can make catapult at home with our kids absolutely’. Building a catapult with our kids would starts out as a craft and ends with an energetic fun activity. The end result could be the wonderful and perfect toy for kids.
What is a Catapult?
A catapult is an ancient weapon or a ballistic device used mainly to launch stones, spears, and projectiles to a greater distance without the help of explosives. It is in use since ancient times and proven to be one of the most effective mechanisms in military during war.
Making a Catapult is a classic building activity and fun science project for kids during summer. This activity doesn’t need you to run behind the fancy stores since it requires only few commonly used household things (kids are familiar with).
Today, we made three different mini catapults in three different methods. I have included a video too along with the post i.e. on the catapult action-how it works after it is made. I know you all are also eagerly waiting to learn. Ok! Let us learn how to make a catapult at home.
No hard and fast rule as to who must try this activity. It is best suited for all the naughty little toddlers, girls and boys from age 3 and above. My little ones are 3+ and 5+ and both had equal fun.
Off course the preschoolers need some guidance and support, to begin with, the projectiles as well as to measure the distance. Instruct them to make a mark with chalk on the floor every time the projectile reaches to know the longest distance the catapult travels. Explain to them why the distance varies every time even though it is the same catapult and same kid does it.
However, 5+ years kids will be eager to measure the distance on their own. You can even teach them to make a table and draw a graph with many readings. Don’t spoon-feed them but ask them to find a way to measure the distance. You will be surprised to see the brainpower of your kids.
On the other hand, ask 7+ kids to design a catapult on their own. They will start from scratch. Let them find out by making the arms short and long to see how they work and the projectile distance. They will understand the force and the foolproof length of the arm etc by doing on their own.
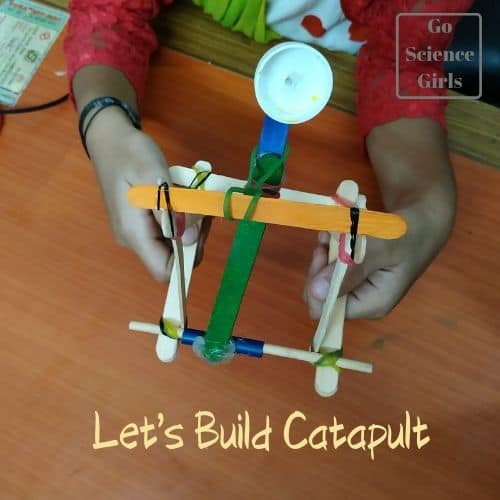
Method 1 : Making a Catapult at home using Popsicle sticks
Items needed to build a catapult
Building a mini catapult with Popsicle sticks require very few items or supplies. Let us see.
- Popsicle sticks
- Rubber bands (choose different colours)
- A bottle cap from a milk jar or gallon jar
- Hot glue gun
- Tiny objects like cotton balls to launch
- Straw (prefer big one)
- Wood
- Spring
[*Product links are affiliate links. Your support is highly appreciated]
Procedure
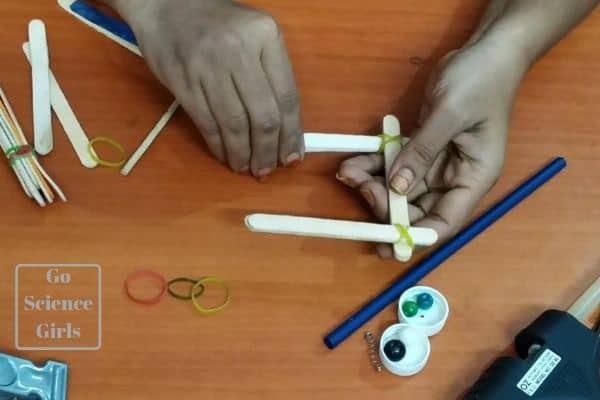
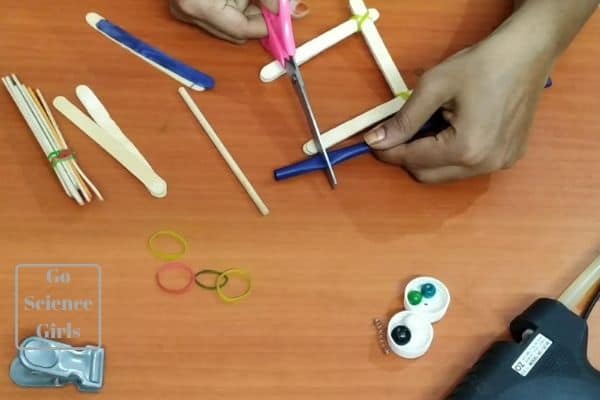
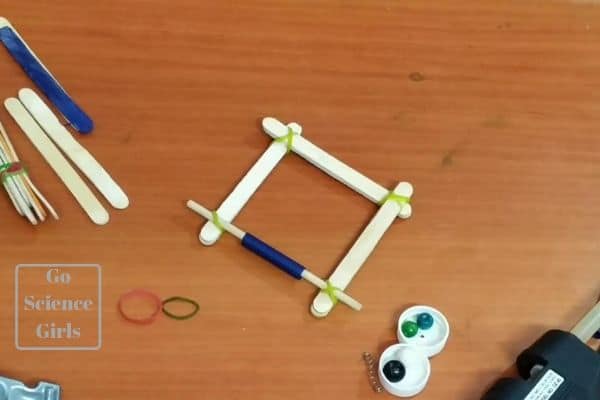
Step-1: Create the base of the catapult
Stack two Popsicle sticks and glue it together in order to make it standard. Make a square shaped base using these stacked popsicles. Use rubber bands to make ‘U’ shape and tie them near corners to create a square shaped base. On the fourth side, use a cylindrical shaped thin wooden stick and tie it to the corners of the ‘U’ shaped base so that it is making a square shaped base all together. Do not forget to pass a 2 inch straw piece in the middle of the wooden stick.
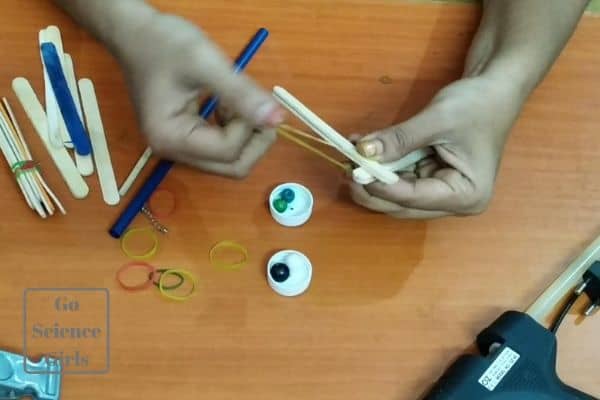
Step-2: Create a t-shape
As the title suggests, create a ‘T’ shape at the fourth side where we have attached a piece of straw. This time you need to use glue to fix it to the Popsicle stick since it need to be strong to hold little weight.
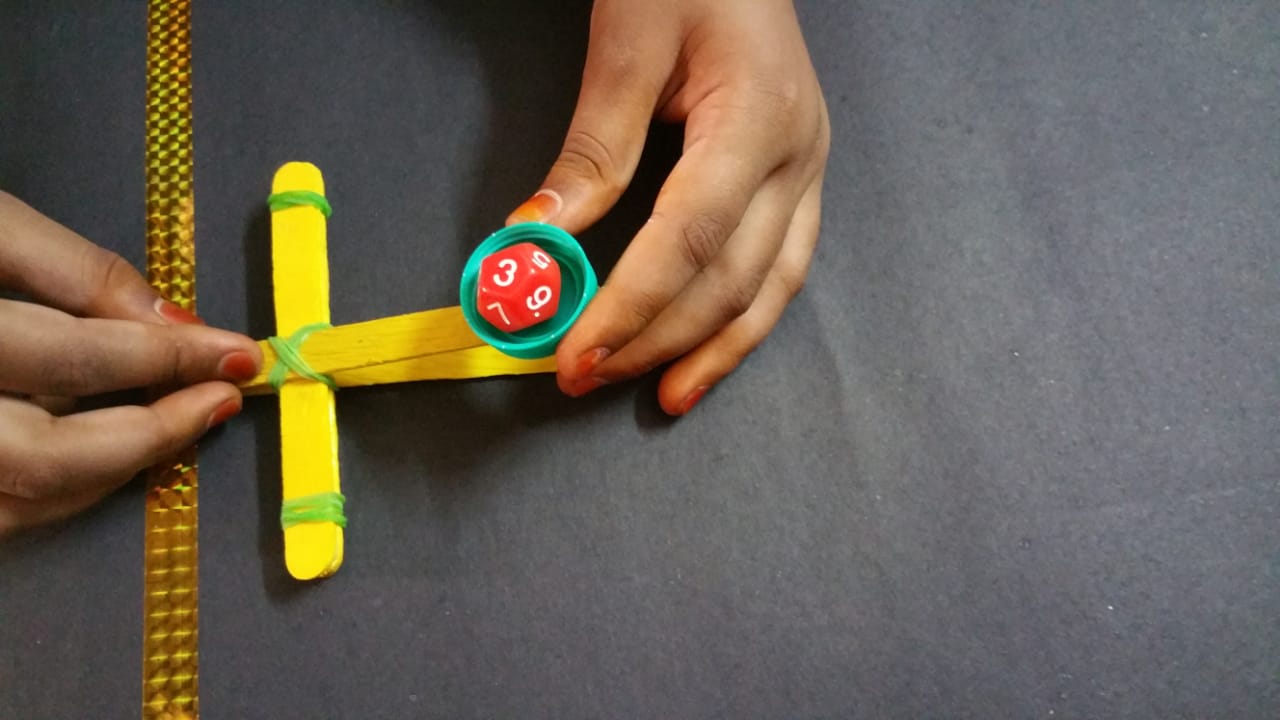
Step-3: Attach Bottle cap
Now, it’s time to arrange some space for the projectiles (nothing but our tiny objects like marsh mallows or cotton balls or any light weighted plastic balls) to launch. Attach a bottle cap upside down to the free end of the ‘T’ shaped Popsicle (on top side). The bottle cap is used to launch tiny objects as projectiles for our activity. 🙂
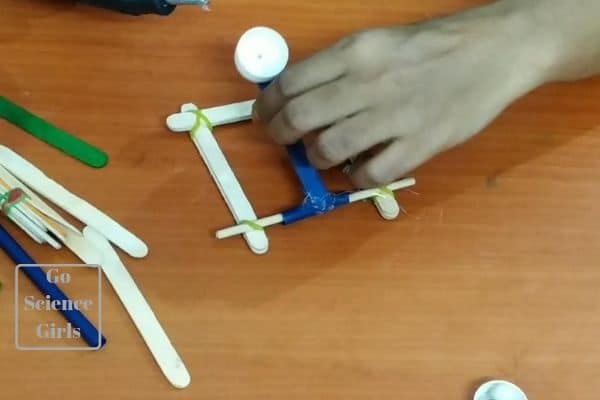
Step-4: Attach a spring
A spring of about an inch should be attached to the Popsicle stick which is quiet opposite side of the wooden stick where the straw is inserted. Glue it to the Popsicle so that it does not move or shake during experiment. After attaching the spring make sure the spring is quiet in the middle of the Popsicle and quiet down to the bottle cap end as shown in the figure.
Here we go, our powerful mini catapult is ready to launch projectiles for our simple and engineering project for our little ones. My kids had a blast after preparing this in front of their eyes. All it needs is a little patience and time for your kids to show them such a beautiful and educational act.
Method 2 : Using the Same Base
Now we are going to learn second method using the same base. This time my elder daughter created the base in my direction. I am happy kids showing interest towards STEM activities. J
Step-1 Create a base
Create a square shaped base using Popsicle sticks, rubber bands, wooden stick, a piece of straw and glue. You can go through the step 1 of first method and follow the same.
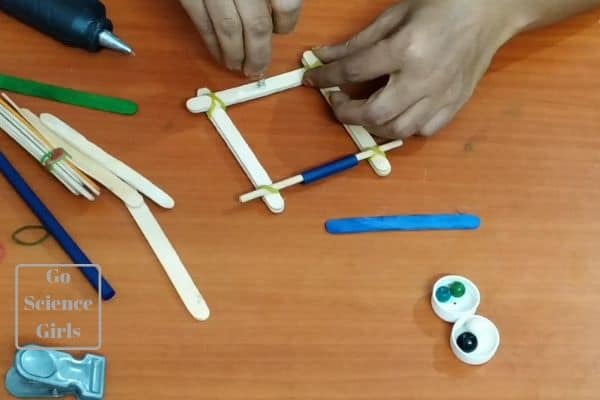
Step-2: Attach Vertical Supporting Structures
Do not get confused!! Look at the picture and you will get an idea. Just attach to Popsicle sticks vertically to end of the base means you are attaching two Popsicle sticks each at one side. No need to add on all sides. Just attach to the adjacent sides of the wooden stick.
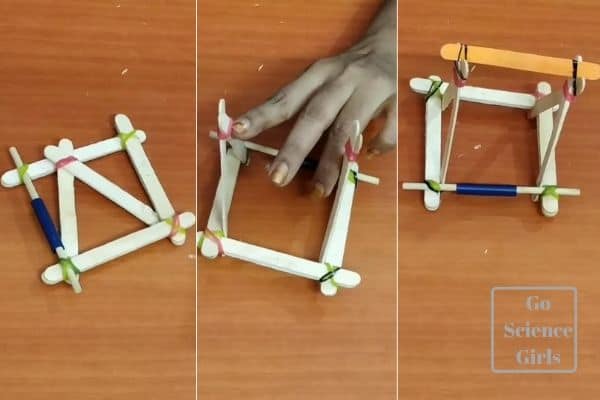
As shown in the figure bring the two free ends of the vertically placed Popsicle sticks to the middle point and tie them with a rubber band. Repeat the same to the other opposite side also. Now the Popsicle sticks give triangle shape (when we look from the sides) and looks like supporting or side walls to the base.
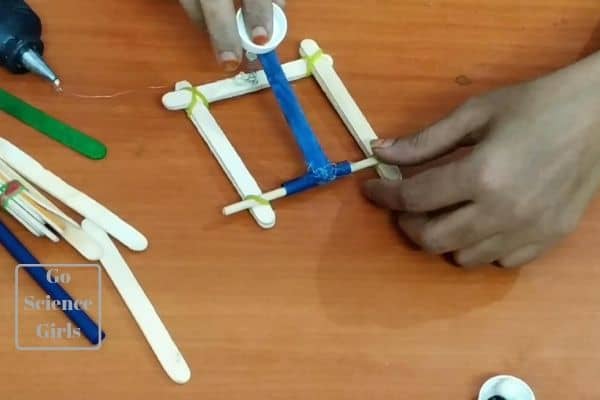
Step-3: Place a Popsicle stick on the top
Now as we called it as supporting walls, place a Popsicle stick horizontally attaching both the vertical shaped structures on the sides. Always see the figures we uploaded not to get mislead. Take the support of the ‘V’ shaped groove formed while making the vertical shaped assemblies. Now the whole structure gives the shape of a swing (outline shape) which we see in the kids play area.
Step-4 Attach the basket to launch projectiles
Arrange the basket for our tiny projectiles to launch again using Popsicle stick. At one free end attach a piece of straw in order to extend the length according to our catapult skeleton. (If it is not required for you then you can directly attach the bottle cap to the Popsicle stick. This is an optional step).
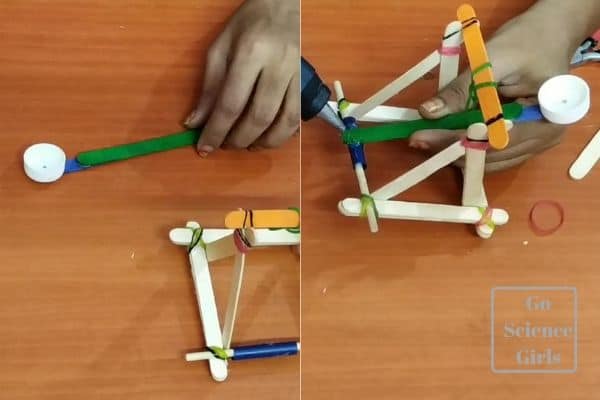
Step-5: Glue the basket to the Catapult skeleton
Now attach the already made basket arrangement (shooting arm) to the straw using a glue. Glue fixes the shooting arm strongly so that it could bear enough tension. Use rubber bands and twist along the shooting arm and the horizontal Popsicle stick to give enough tension to the shooting arm.
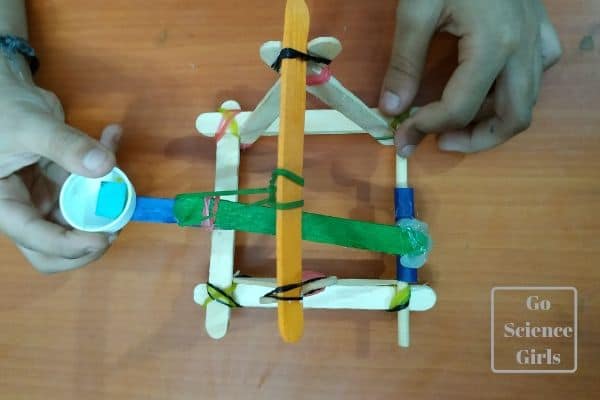
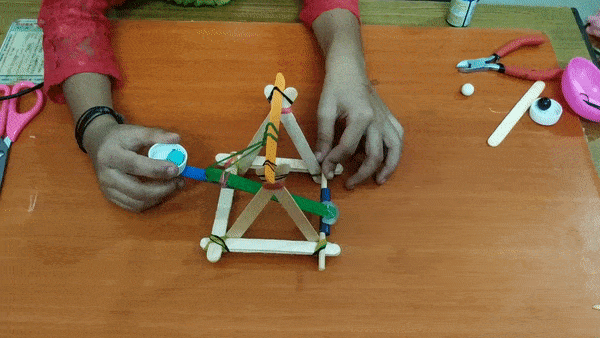
Load some small and light weighed objects to the ammunition basket and that’s it. Your mini catapult is ready to fire.
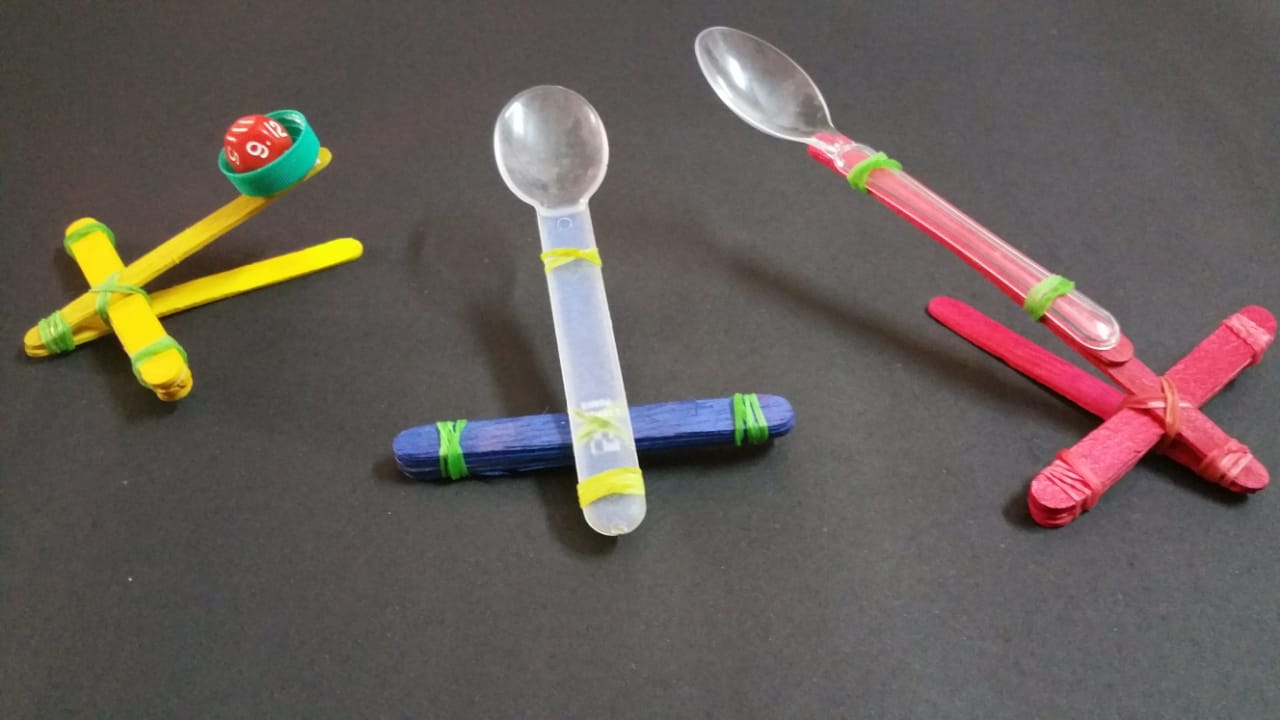
Method 3 : Plastic Spoons and Popsicle sticks
Supplies required
- Popsicle sticks
- Rubber Bands
- Spring
- Plastic spoons
- Bottle cap
- Glue
[*Product links are affiliate links. Your support is highly appreciated]
Step-1: Create a base
As we do in above two methods, the first step is to create base but this time it is different base. Let us see what it is!
You can follow the step by step instructions given in the Instructables as I did as they are clear and visual.
Take 5 Popsicle sticks and stack them together on top of each other. Be sure to stack them neatly. You can use the tighter rubber band to secure them tightly and not to move.
Step-2: Create an arm
Take another two Popsicle sticks and stack them on top of each other (as we did in the first step). Secure them at one end with the help of rubber band. So simple!! You are done with creating arm. Are you thinking how!? Don’t scratch your head. J Here the simple trick is just bend the other free end towards you (means outwards) thus creating an arm.
Step-3: Attach the base to the arm
Take the arm base and pull one of the free end of the stacked Popsicle base towards you resulting in a ‘V’ shape format. Now place the main base (made of 5 stacked Popsicles) in between the ‘V’ shape of the arm. Make sure you place the main base one half inch away from the end that is tied with rubber band.
Wrap a rubber band around the arm and the base in order to secure the arm to the base.
Step-4: Glue the Bottle Cap
Now create a basket for the ammunition to launch. Glue a bottle cap to the free end of the arm of the mini catapult that serves as a basket for projectiles (marsh mallows, ping poms, cotton balls) to launch.
Your catapult is ready to launch your tiny projectiles. J As I said it is very easy to assemble catapult using Popsicle sticks and rubber bands. Am I right!? Hope you all agree. J You can try using simple plastic spoons attaching to the free end of the Popsicle stick and make use it as an ammunition basket. Use rubber bands to fix the spoons to the Popsicle stick.
Observations
Don’t panic to look at this picture, trust me it is easy once you get a hold of the design. Kids can do it themselves. So have the patience for the first time.
1) Try changing the different angles of the rubber bands
2) Add additional tighter rubber bands and observe whether it is making any difference in catapult’s power.
3) Launch different objects in the ammunition basket like ping pong balls, pom poms, and marsh mallows etc. and observe which one is going farthest!
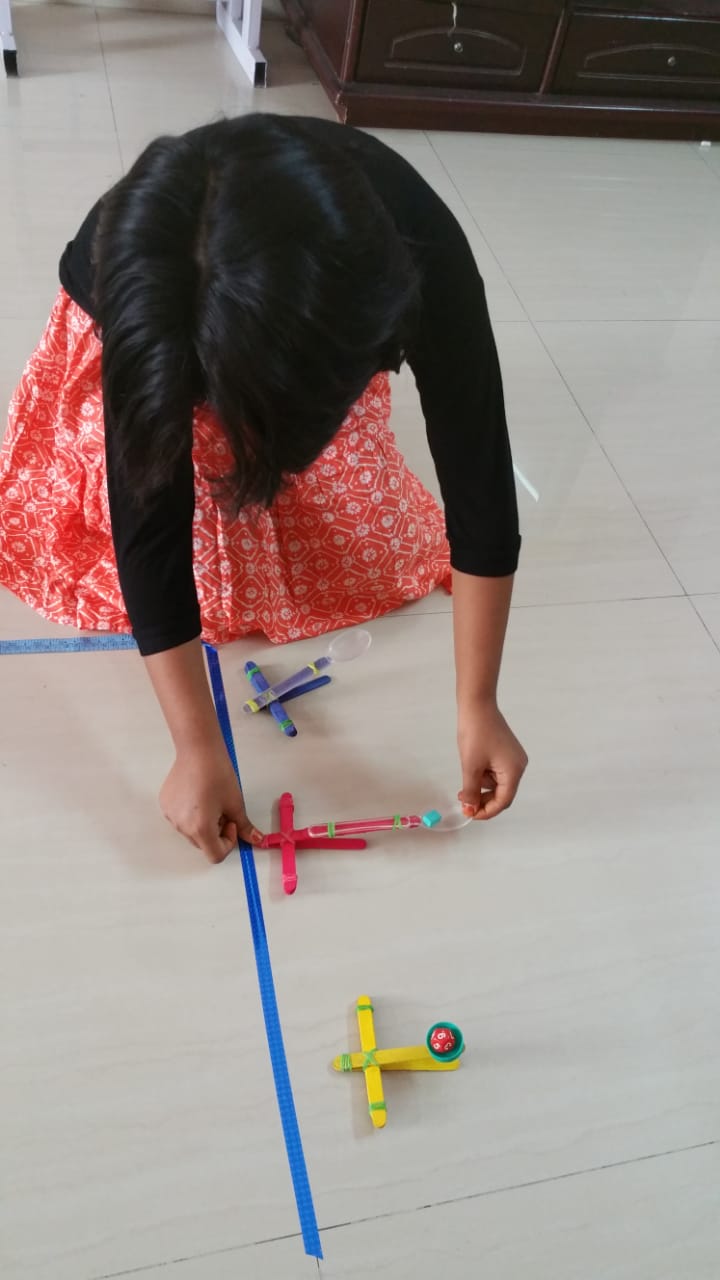
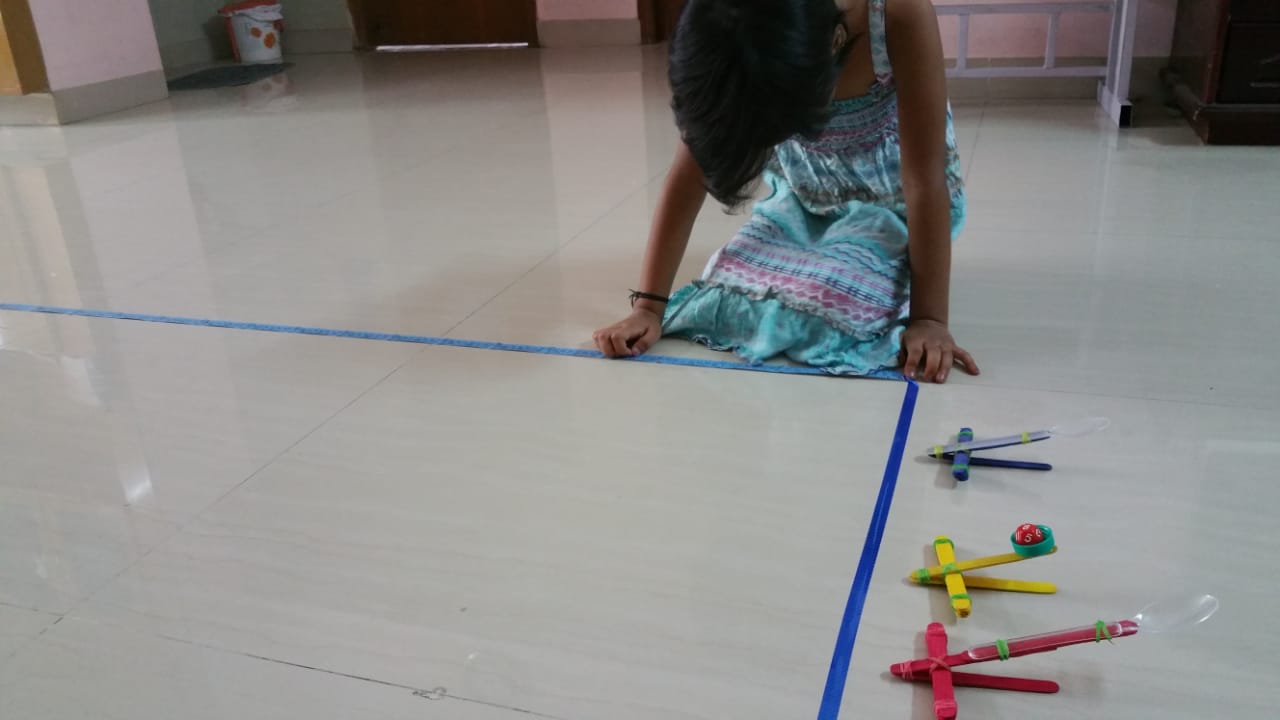
Test #1: Which is powerful and travels a long distance
My younger one Tisha was so excited to do it. With a line marked on the floor as the beginning line, we began with our experiment. Every time she used the catapult and started making lines on the floor to measure the distance. She did a great job using a tape. With my help, she also noted the readings down.
My elder one Pritika did it herself and measured too. Both of them tried thrice on all catapults and compared the measurements.
Test#2: Now to measure the height
We now started talking about measuring the height as we thoroughly understood and equally had fun with the length. Here we even shared views about the design and the trajectory.
Now we did it with a Magna Tile tower to monitor the square in which the projectile hits and that was easy to measure the height as well.
It all began with a 6 square high tower. Yes, we did it and the projectile reached the top. Again we made some changes to the tower height and adjusted the start line position as well.
We tried a couple of times to conclude on some details by using all the 3 catapults. Finally, we understood that we require a tall tower.
Using a catapult now launching a projectile is quick and easy and there are no explosives required.
The science behind it explains kids to learn how the energy is created, stored, transferred and converted. Basically, a catapult works on energy transfer from one object to another object. We are talking about the energy much but where is this energy stored!? The energy is added and stored in the Popsicle stick when the tiny projectiles are added to the basket (bottle cap).
When you let go the Popsicle stick, the stored energy is transferred to the object launched in the bottle cap which then flies through the air. Catapult also uses the elastic energy which is transformed into the kinetic energy under tension stored in the rubber bands. Here we need to remember one physics formula we studied in our school. I.e. the amount of force is directly related to the amount of the mass. If the mass of the projectile is increased, then it requires more force to convert the stored energy into kinetic energy. The extra force is created by using more elastic bands. The transferred kinetic energy is the main reason for throwing the projectile out of the bottle cap.
These devices are in use for several years as well they come in any size and shape. There are simple slingshot types and complicated trebuchet types are available. These are large one which will let launching of large boulders and knocking down even a castle wall is easy.
The path taken by the projectile is called the trajectory. The material flies in the air and the force applied to the catapult influences this distance. The release angle, projectile weight, resistance of air as well as gravity can be learned in this experiment.
You can make your own catapult and it is the best STEM activities which you should not miss ever. Loads of fun and science in it.
We did not stop just with making the experiment but explained about the need for STEM to little girls. We always want to make out little princess a scientist.
Now, coming to the catapult, we already made an upcycled catapult and enjoyed deeply. This time we are making a catapult with a twist and used ice candy sticks. Do you know what, I have a fascination for this since my childhood? Made this dream come true with my two angles.
It’s time to try yourself to find the catapult projectile distance, trajectory height, and consistency as well. You can try with different objects and apply different force to test in a different manner.
Check out for more ideas on our Fun Activities in Physics Page.
- Try this upcycled catapult without buying anything from outside.
- Refraction and light experiment requires nothing but water in a glass, paper, and pen.
- Balance scale can be done to compare weights.
- Magna Tiles experiment is also a great way to explore geometrical shapes and much more.
More interested in Catapults ? Try our collections:
Checkout our Catapult Activities Collections:
- 18+ Collection of DIY Catapult Models using variety of materials
- Innovative Catapults from Popsicle’s – 10 unique Models
We would love to have you following us in Pinterest on the titles Go Science Girls.
It is also good if you can subscribe our newsletters to get updates on our activities. Yes, we will send mail to you and help you teaching science to your kids in a fun way.
Some Questions for Discussion
What is the science behind rubber band catapult?
The catapult science basically involves some physics and engineering skills to hurl a projectile without the use of an explosive. It works mainly by using potential and kinetic energy stored in the rubber bands. Potential energy is the store energy where as the kinetic energy is the energy in motion. Also, the three primary energy storage mechanisms that help the catapult to work are torsion, tension and gravity. A catapult store energy every time you stretch the rubber band and until you hit the trigger. When you let go off this rubber band, the potential energy is released creating a force. The force of this energy is responsible for the flung of any object (upwards or forwards) attached to the rubber band.
How does a catapult get its energy?
A catapult gets energy either from the twisted ropes or the rubber bands. When you stretch a rubber band the potential energy stored is converted into kinetic energy. These are the two main energies used for the catapult’s action.
How high can a catapult shoot?
In medieval period, the largest trebuchets (with throwing arms 50 feet in length and ~20,000 lbs counterweight) could throw stones 200-300 lbs to a distance of about 1000 feet. While the modern torsion catapults can fire 400 m to 500 m and any that can’t shoot 300 m [ i.e.. bow range] are useless. To achieve maximum accuracy and effect rocks must be spherical.
Who invented catapult?
Catapults were invented by the ancient Greeks. The Greek Dionysius (the Elder of Syracuse), who was looking to develop a new type of weapon, invented the catapult about 400 BCE. Thereafter, it became a key weapon in warfare and remained so up through medieval times. In ancient India, they were used by the Magadhan Emperor Ajatshatru around (the early to mid) 5th century BC.
How does a catapult relate to physics?
A catapult actually works on the three main terms of physics i.e. tension, torsion and gravity. Also it works on energy storage mechanisms (nothing but the stored potential energy and energy in motion kinetic energy) says that a catapult works on physics. Newton’s second law relates an acceleration, object’s mass, and force with which it is moving. We can also observe this law when the projectile hits the ground. All these moments reminds us physics.
What are the 3 type sof catapults?
The three main types of catapults are:
1) Ballista: The ballista is a missile weapon, very similar to a cross bow that launches a large projectile at a distant target.
2) Mangonel: The mangonel is the most iconic catapult which comes the first in our mind when we think of catapults. It is basically made of wooden arms and a bucket to launch projectiles.
3) Trebuchet: The trebuchet is bit different in model when compared to the above two catapults. It is made with a long arm (balanced on a fulcrum) and short arm (to counter balance). The Trebuchet was designed for max power and distance.
What kind of energy is used in a catapult?
When you use your catapult to launch a cube you are transforming Potential into Kinetic Energy. Potential Energy is the stored energy and the kinetic energy is the energy of motion. When you twist the rubber band, tension is created and stored in the twisted band. When you let go the rubber band the released kinetic energy helps to throw off the launched projectile.
What came first the catapult or trebuchet?
Catapults are invented first during ancient times. Though they are good at accuracy, trebuchets are invented by chinese to attain greater range of accuracy and maximum force and power. The main difference between both are trebuchet uses a swinging arm to throw a projectile. Without such a sling (swinging arm), the machine would be a catapult.
Why is a trebuchet better than a catapult?
Trebuchet are most powerful catapults, specially designed for maximum force and power. Trebuchets are believed to be invented by the chinese in 300 BC. The trebuchet was preferred over a catapult due to its greater accuracy and greater range capability. A trebuchet works by using the energy of a falling (and hinged) counterweight to launch a projectile, using mechanical advantage to achieve a high launch speed.

This information was very helpful in helping us plan and prepare our stem catapult project. Thank you for making this information available to us and anyone else who may need it.