In this article, we wanted to explain how we conducted ‘Balloon Rocket Race’ – simple science activity at home to explain Newton’s third law of motion. It is the basic principle under which the actual rockets work.
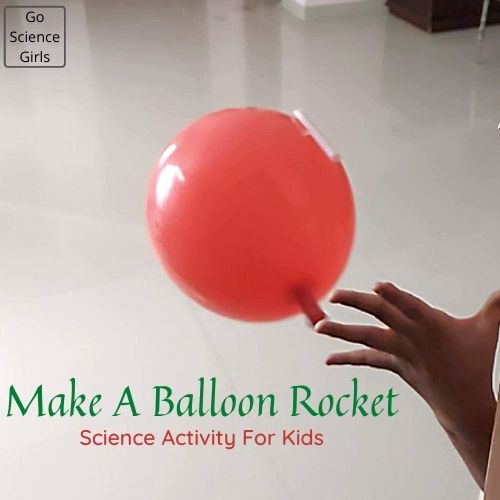
Make a Balloon Rocket
Objective of Making Balloon Rocket: To explore the basic principles of science concepts such as Force, Newton’s Third Law of Motion, Push, thrust, and Pressure.
Materials needed to build a Balloon Rocket
This is one of the fascinating science explorations that asks for a few supplies from your child’s stationary kit. Let us see what those supplies are:
1) The main hero of the Experiment: Balloons (the number depends on how many rockets you want to build)
2) Straws
3) A roll of string
4) Glue, Scissors, Tape, and any other stationary material required while building the balloon rocket.
That’s it, you are ready to perform this classic science experiment. Read on to learn the instructions to make a balloon powered rocket.
Instructions to make a Balloon Rocket
Sounds so interesting huh!! Does your child excited to build a balloon rocket? Then, let your child follow the simple step-by-step instructions mentioned below. Have a look!
Step-1
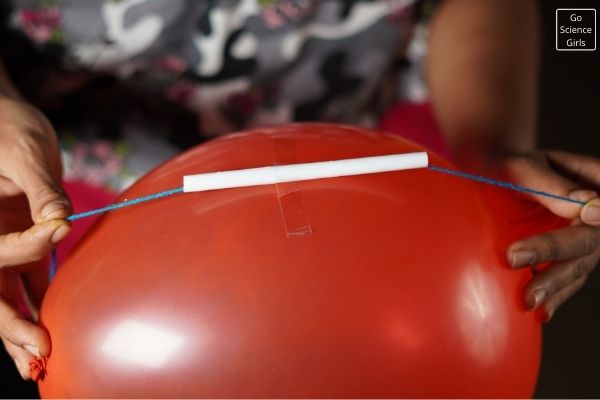
Firstly, decide on what length you want to run your rocket. Or let your child decide from which room to which room he/she wants to send their message. Once you and your child decide the travel length, hold one end of the string and tie it at the starting point. You can even use tape to secure it tightly. (In this experiment you can see, we tied one end of the string to the door handle and the other end to the other door. And we made sure there is 50 metres distance between the door handles.)
Step-2
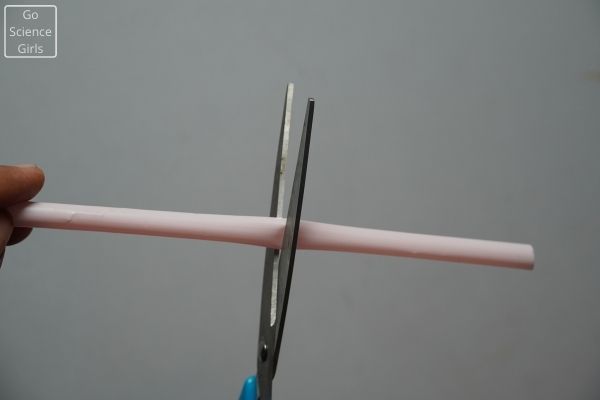
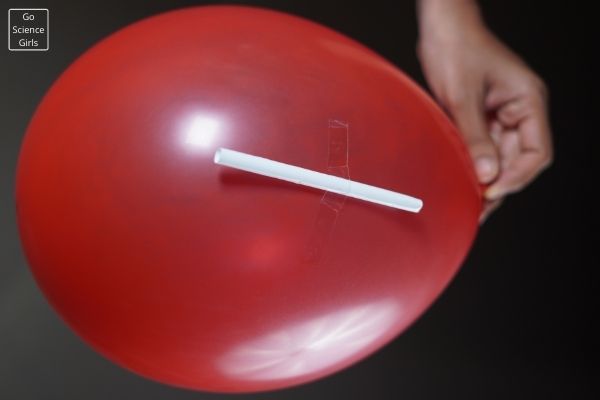
Now, pick the other end and pass it through a piece of straw. Cut the straw length according to your measurements. Mainly the length of the straw depends on the circumference of the balloon after inflated. Moving on, pull the string from the other end tightly and tape it to the other supporting end. In this experiment, the other end is the door handle opposite and 50m away from the starting point. You can see in the pictures or videos attached.
Extension point: You can use a chair, or a table, or an iron fencing, or any other material (as a support) that holds the string tight and unmoved.
Step-3
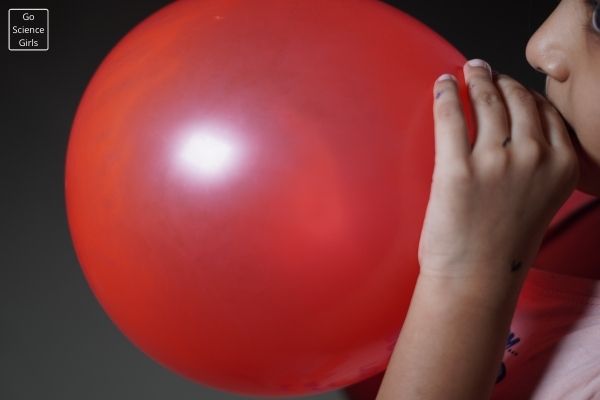
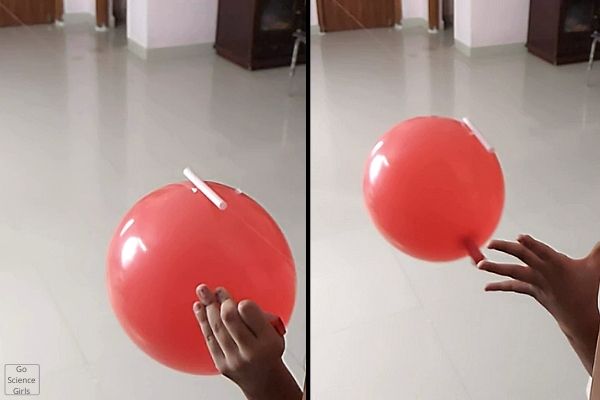
Here comes the time for inflating the balloon. Inflate the balloon carefully and do not let the air to slip away. To do job, you can pinch the neck of the balloon, twist it, and clamp it shut using a paper clip. Or simply you can use your fingers to pack the air inside. Such that you are securing the air pressure created inside the balloon. Take enough time to do this step since it requires a much concentration and perfection. It looks tricky but it is not difficult!
Step-4
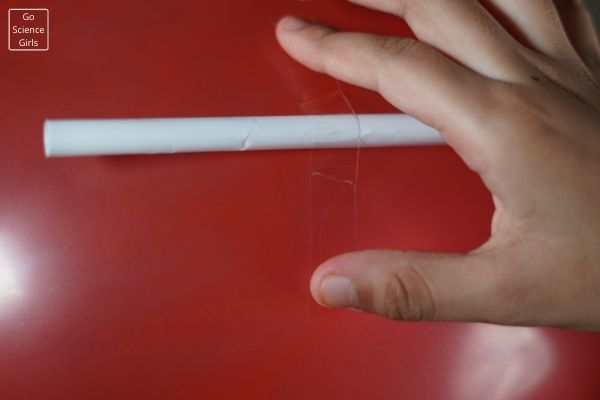
The next step is attaching the inflated balloon to the straw which is passed through the string. Secure the inflated balloon to the straw using a tape. Make sure the neck of the inflated balloon is quite parallel to the straw. That means the opening of the balloon and the position of straw are placed in horizontal and parallel position.
Make a note: Make sure you are still holding or keeping the opening of the balloon shut. If you let the air go, then all your efforts of building rocket communication set up goes in the vain. So please be careful while holding the neck of inflated balloon shut no matter how you are securing it. Also, make sure the string is tied a bit far from the ground level, may be at the height of child’s chest level. If you are tying the strings to the ground level then your rocket may not find enough space to run along the string. Hence, it is important to maintain some distance from the ground level.
Step-5
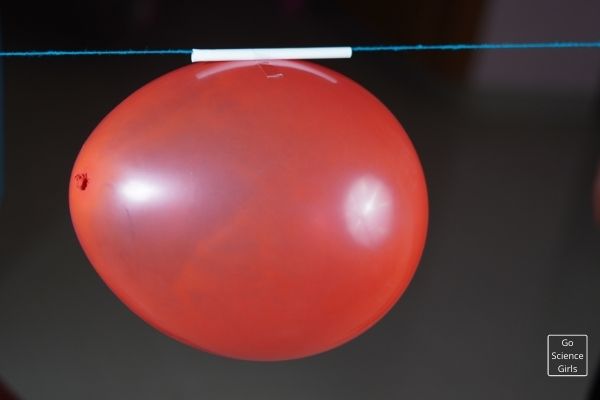
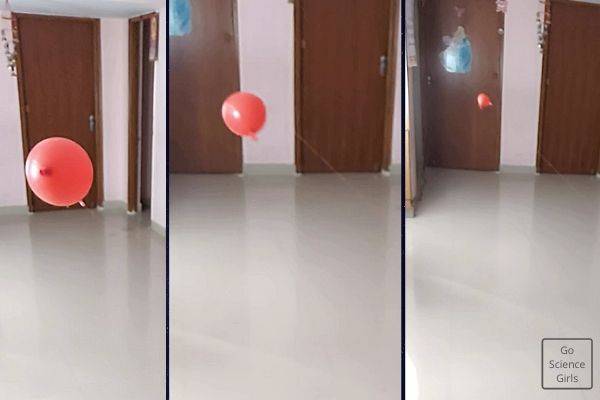
We are almost at the end of the procedure to run our homemade rocket using inflated balloon. Now, bring the whole balloon set up on the string to one end. This end could be the starting point such that the opening of the inflated balloon lies in opposite direction to other end of the string. That means the inflated balloon opening is fronting to you.
Step-6
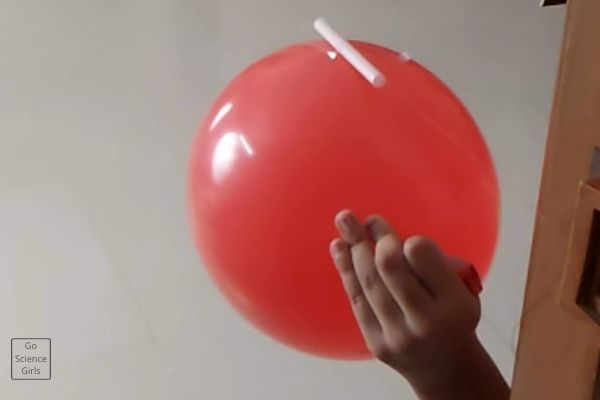
It is time to launch or fly our balloon rocket over the string! I think your kids are excited to watch how their homemade rocket is going to work. Hence, without any delay let us go off the balloon by releasing the closed opening of it. And enjoy watching the amazing movement of the balloon along the string from one end to other end.
Step-7
If you want to use this balloon rocket set up for communication, then you need to do one more step. Prepare a box or container shape out of light-weight cardboard or thick paper and attach this on top of the straw. Now the set up appears like the bottom of the straw is attached to inflated balloon whereas the top side of the straw is attached to the box. So, now you are ready to communicate from one room to another by just putting a paper message in the container and let the balloon go. Super exciting right!
Collecting Data
Ask your children the following while performing the experiment:
1) To calculate the distance travelled by the balloon on the string.
2) To record what actually is happening when the air inside the balloon is let outside
Questions Asked
Ask your children the following questions and let them guess the answers. In this way, you can improve child’s thinking capacity, problem solving nature, and critical thinking power.
1) Why is it required to maintain certain distance from the ground level?
2) What could be the reason behind closing the opening of inflated balloon?
3) Is there any other possibility to run the balloon rocket other than closing the balloon’s mouth shut?
4) Why are we keeping the straw position and the mouth of the inflated balloon horizontal and parallel?
5) What are the other possibilities to hold the air inside balloon from escape?
Other Balloon Science Activities – you might be interested exploring:
Density Science with Xenon Balloon
Balloon Salt & Pepper Experiment
Experiment Extension Tips
Build a Balloon Rocket is a great experiment that offers many opportunities to extend the explorations. Let us see what we can do to extend the science explorations in this experiment.
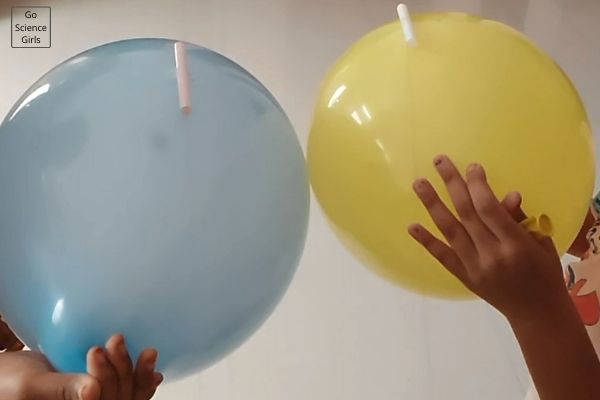
1) Take two more inflated balloons and try to run over the string using the same instructions.
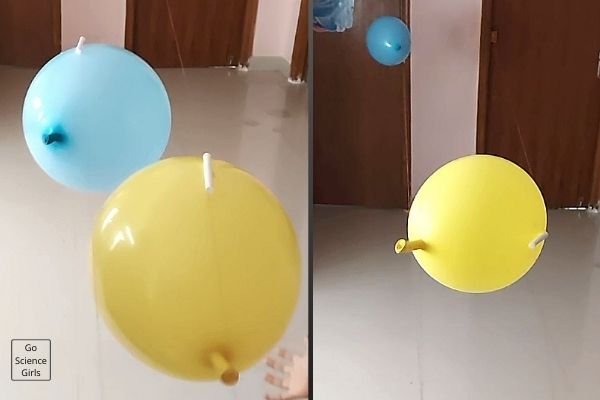
2) Try to inflate two balloons to different sizes or circumferences. That means, inflate one balloon bigger and the other smaller in sizes. And check on the string which size of the balloon is travelling fast and how long they are travelling.
3) Make trials by increasing the number of balloons and with the varying sizes. You can ask your child to create a record sheet and mention all the data collected during all the trials.
4) Use different types of stuff to replace string like thread, a thin wire, a copper wire, etc. And see whether there is any difference in the results.
5) Change the angle of the string and predict what happens.
6) Try to adjust the balloon shapes like flower shape, bunny shape, twisted balloons, etc. And check whether the shape of the balloon impacts the rocket travel distance.
7) Set the experiment run way in vertical position and ask children to run their balloon rocket. Check whether the balloon rocket travels the same way as in the horizontal position. Also, check if there is any change between the distance travelled in horizontal position and vertical position.
Predictable Failures
Since this is an experiment based on many trials, it is obvious that there are high chances of doing mistakes. And these mistakes put your rocket at failure end. So what do you need to do if your rocket goes failed? Firstly, do not worry if your homemade rocket fail to fly. Stay calm and think what could be the reason. Rule out the mistake and make your balloon rocket a successful one. Meanwhile, you can also check the tips mentioned below that may help you to figure out the mistakes done. Here we go!
1) Reduce the Weight: Mass and acceleration go in opposite ways that means you can increase the acceleration by reducing the weight. Well, we are going to apply the same in this experiment. Use light-weight tapes, straws, and balloons to reduce the weight of the balloon rocket. In this way, we are making our rocket to run smoothly and lightly.
2) Reduce Drag: Since the balloon rocket is light-weight, we need to maintain air resistance. Here, air resistance is nothing but the drag. By reducing the air resistance, you are letting the force to escape in lesser amounts and increasing the speed of travel at the same time.
3) Change the nozzle of the balloon: Change the opening of the balloon by attaching some other appliances like ready-made nozzles, pipes, etc. This step could also be used as extension step. Changing the mode of passage through which we release the inside air may change the end results of the experiment.
Hence, using ready-made nozzles let the air to flow out of the balloon in one direction. And do not let air to escape in other directions like what happens with the rubber neck of the balloon. Cool huh!
Let us learn the science which makes our homemade balloon rocket to run on the string
Balloon rocket simply works on the principles of Newton’s Third Law: “Every Action has an Opposite Reaction”. Well, what demonstrates the action and opposite reaction in this experiment? Let us see.
The action is: holding the air pressure inside the balloon after inflating. And the reaction is: when the inflated balloon is released, the air rushes out and moves the balloon in opposite. The air coming out of balloon is pushing the air nearby the balloon and let the balloon move in opposite direction. Simply put, the air that is rushing out of the balloon is the action whereas the balloon moving in opposite direction is the opposite reaction. Therefore, we can say all these actions and reactions are happening because of force, air, pressure, push, and thrust.
If you are taking bigger and smaller sized balloons, what do you think on which balloon moves faster? Let me tell you, the bigger balloon travels fast when compared to the smaller ones because it pushes more air against the air around the balloon on the outer side.
FAQs
A balloon is the great catalyst to demonstrate how rockets work in a simple science experiment. The air inside the balloon creates energy. When the air is released, the pressure and force created by trapping the air inside balloon comes out pushes the air around the balloon. The air pushed out creates a force in forward motion and it is known as “Thrust”. Releasing of air from the inflated balloon is the action force in balloon rocket experiment.
When the air pushes out of the balloon, it creates a pushing force called thrust against the air around the balloon. The pressure created inside the balloon rushes to come outside as soon as possible. This happens to create balance between the air pressure inside and outside the balloon. When the thrust flows against the air around the balloon, you can see the movement of the balloon rocket.
The movement of balloon rocket happens mainly based on two important forces. They include: Air Resistance and Friction. Friction is nothing but the force created between two sliding surfaces. Air Resistance is defined as the ‘Drag’. Drag is the force that is into action against the relative motion of any object that passes through the air.
Here are the step-by-step instructions to build a two-stage balloon rocket:
1) Take enough length of string that fits across your experiment area or that stretches in your room.
2) Now pass two straws through the string and secure the both ends of the string tightly to their support. Support is nothing but any two objects that are strong enough to hold the string tightly without moving.
3) Create a cardboard ring using cardboard sheet. Make sure the cardboard ring is less than one inch.
4) Blow up the first balloon up to 3/4th length. You need to trap the air inflated inside the balloon using binder or paper clips. While trapping the air inside the balloon, you need to pull the opening of the first balloon through the cardboard ring.
5) Now inflate the second balloon to half-length and pinch it to trap the air inside it. Then, carefully pass the opening of the balloon through the same cardboard ring. Such that both the openings of inflated balloons face same direction.
6) The next step is to blow up the second balloon until it builds up pressure against the cardboard ring inner side. This tricky step helps to deflate the first balloon without releasing the air inside it.
7) Make sure the openings of the two balloons and straws are positioned parallelly.
That’s it, you are done with building two-staged balloon rocket.
Yes, the same technique is used to fly a rocket through the space. We do not require any engine fuel to run the balloon rocket through the space. Because we can blast off the balloon rocket like a space shuttle just using simple concepts of force, thrust, pressure, and drag. To run the balloon rocket into the space, it just requires to provide enough thrust. That’s it, balloon rocket is ready to work in space.
Absolutely yes! Different shapes causes balloon move forward differently. The rounder shape balloons move farther than the other shaped balloons. While the bigger sized balloons travel move faster than the smaller sized balloons. In this way, different shapes absolutely affect the travel length of the balloon rocket.
A: There are three physical Newton’s Laws of Motion which states:
1) First Law: “Every object persists in its state of rest or uniform motion in a straight line unless it is compelled to change that state by forces impressed on it”.
2) Second Law: “Force is equal to the change in momentum per change in time. For a constant mass, force equals mass times acceleration”.
3) Third Law: “For every action, there is an equal and opposite reaction”.
The forces that cause a balloon rise include drag or air resistance and force of gravity. These two forces pulls the balloon weight towards downward direction when there is enough strength. And then, it lifts the balloon to rise.
The thrust created when the air trapped inside the inflated balloon is released is responsible for the forward movement of the balloon. Since the opening of the balloon is rubbery in nature, the thrust is released in every possible direction. Hence, the balloon rocket travel direction is not in a straight line.
Here are the interesting tips to stop an inflated balloon to deflate! Have a look!
1) Mist of any setting spray that is used for hair works amazingly to stop a balloon from stopping.
2) Store the inflated balloons in a large plastic bag so that they will stay safe from blasting off.
3) Pinch the neck of the balloon using binder or paper clips but it is less effective. You need to secure it tightly otherwise the balloon may deflate.
