Here is an interesting DIY Safe Box with Combination Lock from Card Board that you can try with your kids.

A SafeBox is a device that only allows entry to anyone that’s able to enter the correct key combination.
So here is a fun way to build one to keep all your items you don’t want any other person to access. Your kids will love this box.
Materials Required

To build this Safebox with a combination lock, you’ll need the following items.
- Beads
- Pencils
- Ruler
- Glue
- Knife
- Sticks
- Paintbrush
- Cardboard (You can get them from old appliances or ask a local appliance store to help you with some).
- Color chart
- Glue gun
- Color pen
- Current tape
*Product Links are affiliate links – Your support is highly appreciated
Making SafeBox with combination Lock
Step 1. Cut out the pieces
The first step in this project is to cut out the various parts needed to make the cardboard safelock.
1.1: Cut out the cardboard for the bottom and cover of the safelock.
Layout a wide piece of cardboard, and take out your pencil and ruler.

Starting from the edge of the cardboard, draw 4 rectangles using your pencil and ruler. Each rectangle should be sized 9×12 inches.
After measuring and marking out the rectangles, cut out all four using the craft knife.
1.2: Cutout the other cardboards for the safelock.
Layout the cardboard again and use your pencil and ruler to draw the following rectangles on it.
- 8½ x 2½ inches – (draw 2 rectangles of this size)
- 8 x 1 inches – (draw 1 rectangle of this size)
- 9 x 1 inch – (draw 4 rectangles of this size)
- 11½ x 3 inches – (draw 4 rectangles of this size)
The 9”x3” and 11½” x 3” will be used for the sides of the safelock.

Once you’ve drawn all of those, take the knife and carefully cut out every rectangle.
It is important to follow the line while cutting, so the end product would look good.
Step 2. Assemble the safelock
Now that you have the various pieces of the safelock, we can start assembling it.
First, take out the four 9”x12” cutouts (from step 1.1). We will double the cardboard to make the safebox stronger.

Apply glue to one part of the cardboard, and glue the two cardboards together. Also, glue together the remaining two pieces of 9”x12” cardboard.
You also need to glue together the 9”x3” and 11½” x 3”. Take two pieces of each size and glue them together. So you’ll end up with 2 pieces of 9”x3” and 11½” x 3”.
2.1: Wrapping The Cardboards:
To beautify our safeboard, we wrapped the cardboard with three colors of paper wrappers – wine, violet, and patterned orchid. You can choose your preferred color combination using the color chart.
Wrapping the cardboard is just like wrapping the back of books.
2.2 Cut the Wrappers
First, you need to cut the wrapper papers into the appropriate sizes. You’ll need to cut out three wrappers for each cardboard you want to wrap.
- The outer wrapper paper should be an inch larger than the cardboard on all sides (the wine color wrapper in our case).
- The inner wrapper paper should be the same size as the cardboard you want to wrap (the violet color wrapper).
- The last wrap paper should be ½” smaller than the cardboard on all sides (the orchid patterned wrapper).
Cut out the wrapper papers for each part of the box.

2.3. Wrap Individual Pieces
Follow this step to wrap the cardboard with all three wrap papers.
- First, apply glue to one side of the cardboard and position the outer wrap paper, such that it is overlapping by an inch on all sides. Once that holds, apply glue along the top edge of the other side of the cardboard to hold down the extra length. If you’ve wrapped a gift before, this should be a piece of cake.
- Take out the inner wrapper. Apply glue to the inner part of the cardboard (the part where the wrap overlapped). Then position and glue the inner wrapper to it.
- To complete the wrapping, position the smaller wrapper at the center of the cardboard (on top of the outer wrapper). So there’s space on each side. Apply glue and glue it on top of the outer wrapper.
The same thing should be done for the 9”x3” and 11½” x 3” cardboards to ensure uniformity.

– Assembling the Safelock
To assemble the safelock, you’ll need 2 pieces of the 9”x12”, 11″x3″, and 9″x3″ cardboards.
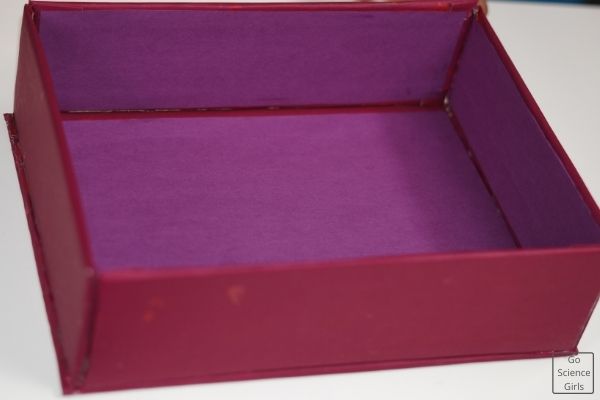
Place one piece of the 9” x 12” on the table (this will act as the bottom of the safelock box).
– Attach the sides
Apply glue to the edge of the bottom cardboard and glue the two 11″x3″ cardboard to each side of it. You can use hot glue to make it Hold.
Once that dries; position and glue the two 9”x3” cardboard on the remaining sides of the bottom cardboard. Next, glue together the various axis where the cardboard meet. You should end up with something like this.
– Attach the Cover
You should be left with 1 unused piece of 9”x12” cardboard which will be the cover of the safelock.
You will use the paper wraps to hold the cover to the end of the box.
Cut out the appropriate sizes of the outer and inner paper wraps. Then position the cardboard and glue it to the already built box, as shown below.

When it dries, you should be able to open and close the safelock easily.

Step 3. Making The Combination Locks

3.1 cutout the circular cardboards
To make the combination lock, you’ll need 6 circular cardboard cutouts.
Find a circular item with a diameter of 2.5 inches or use a compass.
Lay the remaining unused cardboard on the table and use a pencil and compass to draw six 2.5” circles.
Then cut out all the circles with a knife.

3.2: Make the inner and outer rotators
Inner Rotators
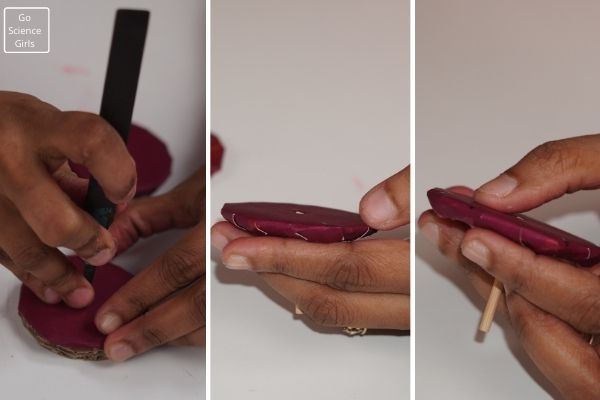
To make the combination inner rotator, you need another cardboard of about ½” in height. It should be lengthy, so you can wrap it around the circular cutouts. Peel off its smooth surface to open the rough part of the cardboard.

Wrap and glue it around the circular cardboard from step 3.2 (as shown below). Ensure that a small portion of the circular cutout isn’t covered with the rough cardboard.
Do this for three of the circular cutouts

Outer rotators
We will use the three circular cardboards remaining to make the outer combination rotators.
Cover each of the three cardboards with paper wraps as shown below and glue them together.
Then use the color pen to mark out the lock numbers at the front edge of each cutout.
Installing the combination lock
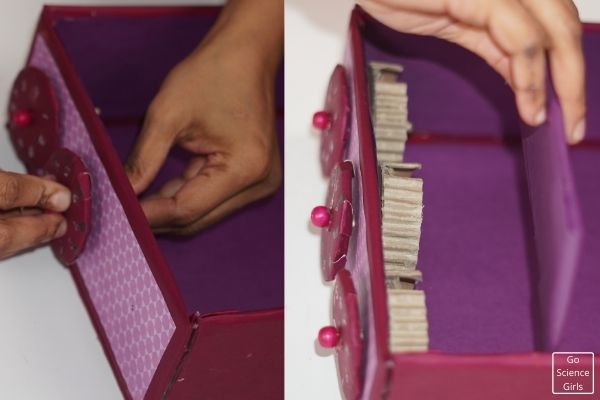
First, you need to open three holes at the front of the box (as shown below). All three holes should be about 1.20 inches below the top of the box so that the inner rotator can be level with the front of the box.
Now you have the three outer rotators and the inner rotator.
- Get the beads. Insert the stick into the opening on the bead and glue it together.
- Insert the stick with the bead into the hole on the outer rotator. Then apply glue to hold together the bead, stick, and outer rotator cardboard.
- With the outer rotator attached, insert the stick through the hole on the box, as shown below.
- Lastly, attach the inner rotator to the stick through its hole, and apply glue to it.
Do this to install all three rotators on the box.
When done, rotate it and ensure all three rotators are free. Then arrange them so the small openings are at the top.
Write out the number combination for when the opening is at the top. It’s what would be used to open the safelock.
Glue together the two pieces of 8½” x 2½” cardboard. Then wrap it with the same wrapper used for the inside of the safelock. Place it 1.5 inches away from the rotators and glue it on all sides.
4. Creating the Lock
Get the 9”x1” cardboard cutout earlier and cover it with paper wrap. Then place it 1½ inches on top of the safelock cover and glue it down, as shown in the image below.
Next, you’ll need three sticks measuring 6cm each. Position them on top of the 9”x1” cardboard so that each of the sticks aligns with the opening on the inner rotator when the box is closed.
You can hold the sticks in position with current tape, and try closing the cover to know if the sticks enter the small opening on the inner rotator.
Once you determine the ideal position, glue the sticks to the top of the 9”x1” cardboard over the cover to complete the project.

Congratulations. This is the last bit of the project. You’ve successfully built a safelock with a combination.
Here is a complete step by step video tutorial:
If you followed the steps, your safelock should look like the one below.
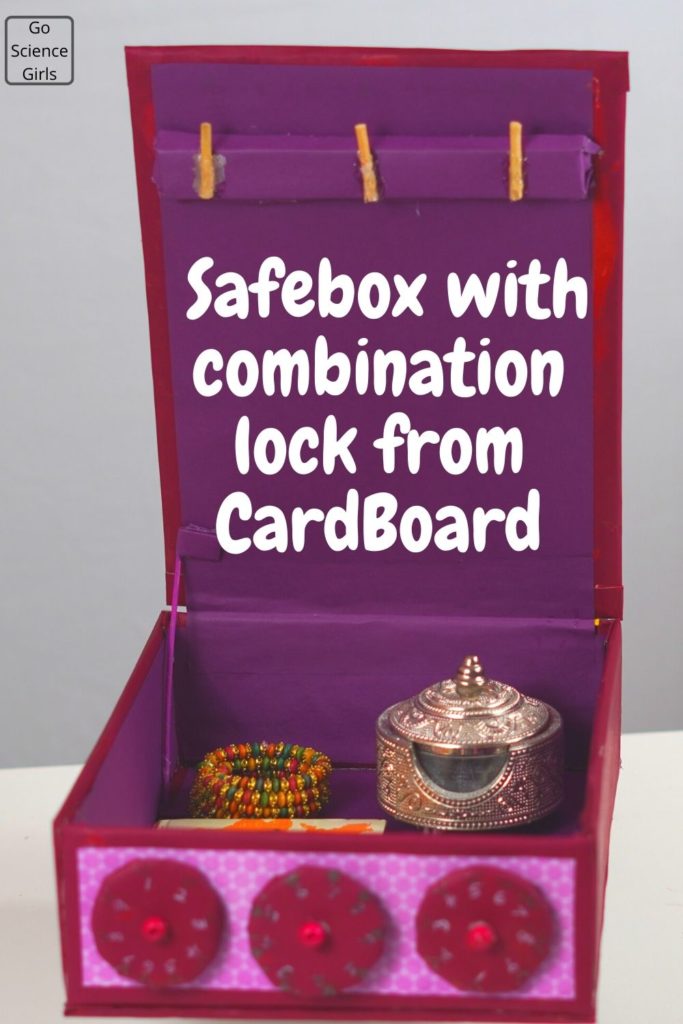
Note: You’ll only be able to open the safelock with the right combination (the number where the rotator hole falls). Write it out.
Interested in More Craft Ideas? Check out:
Amazing Christmas Crafts for Kids

I thought I had to buy them when I would grow up, but this whole crafty idea mesmerized me.