Lady bugs are beautiful!! These tiny creatures have an attractive look with embellished and multi-colored designs. Hence, kids show much interest to explore these beautiful and attractive creatures with googly eyes!
So, we have come up with 3D Paper Model Ladybug Craft! This is a great craft idea that teaches science too. Moreover, it is very easy to construct a beautiful lady bug 3d model using simple stationery supplies.
3D Lady Bug Model Overview
3D lady bug model is a simple and adorable paper craft comes with a lot of fun. Well, I am sure your children are more curious to begin with this wonderful craft, isn’t it!? Let us begin and make the model.
Materials required to make the 3D model Lady Bug Craft
Here are the simple and easily available supplies listed! Kids love to work with these supplies as they are easy to handle and gather at the experiment table. Have a look!
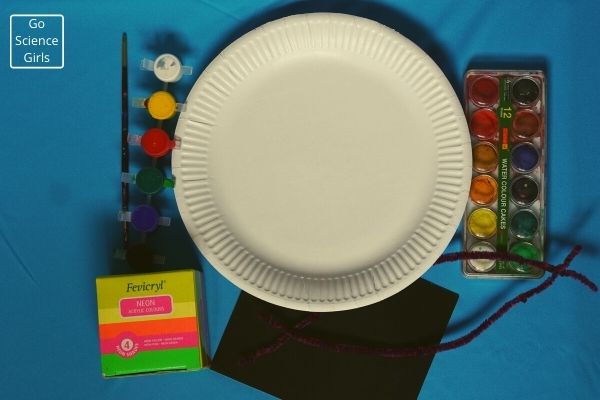
1) 2 Googly Eyes (Optional, You can find in any of the art and craft store). In this craft post, my children drew and painted the googly eyes on their own.
2) 2 White colored paper plates (Make sure the plates are round in shape and small or medium sized)
3) 2-3 Pipe cleaners (you can make color choice, we chose blue colored ones)
4) A black color craft paper
5) Fevicryl Glue
6) Water paints
7) A large Brush
8) Red, white, and black colored acrylic paints
9) 2 Paper Fasteners
10) Scissors
Simple Step-by-Step Instructions to make 3d Lady Bugs
As I told you, it is very easy and fun to construct a 3d model of lady bug. All you need to do is: gather all the listed supplies and simply follow the instructions mentioned below. That’s it!
Note: All the steps and instructions included here help your child to develop his/her fine motor skills. So, let your children to do this activity on their own to improve their craft and motor skills.
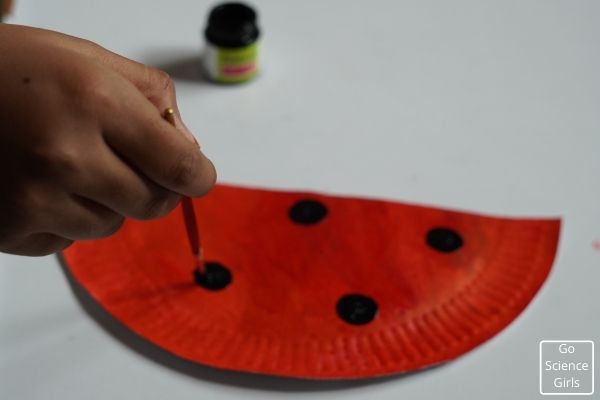
Step-1: Start by coloring the attractive body of our tiny hero of the activity!
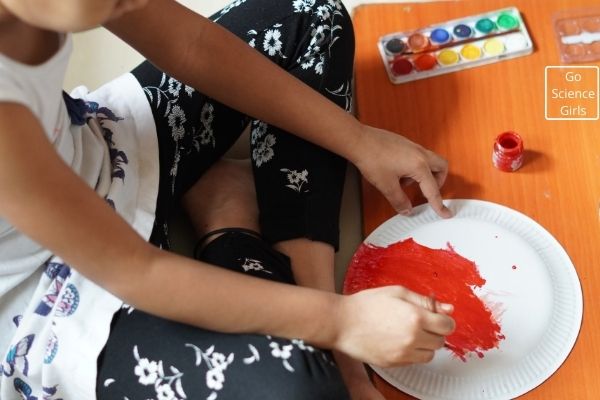
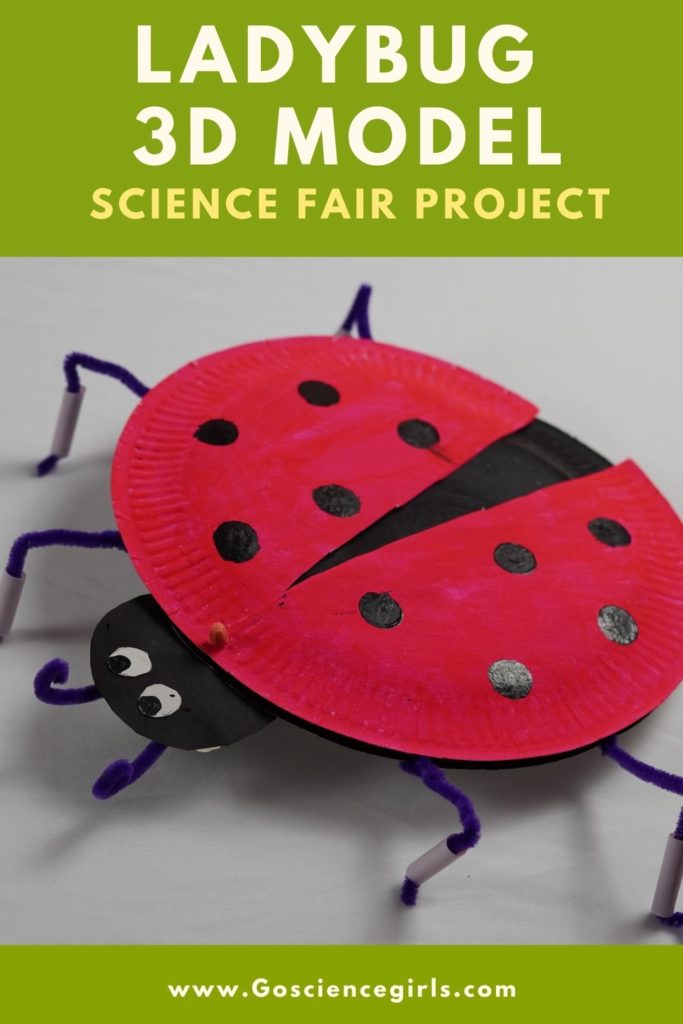
Ask children to pick one paper plate and paint orange acrylic color. Tell them to make sure the white paper plate should look completely like an orange colored ones. Now, we got the body part of the lady bug model. Then, also direct them to pick the other paper plate and color it with black paint same like the previous ones.
Step-2: Decorate the Body
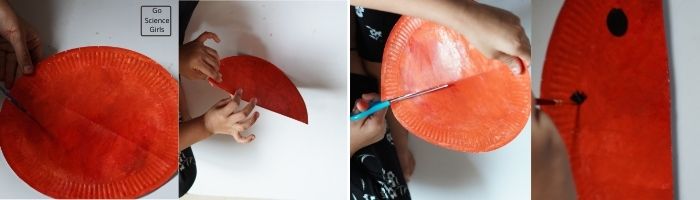
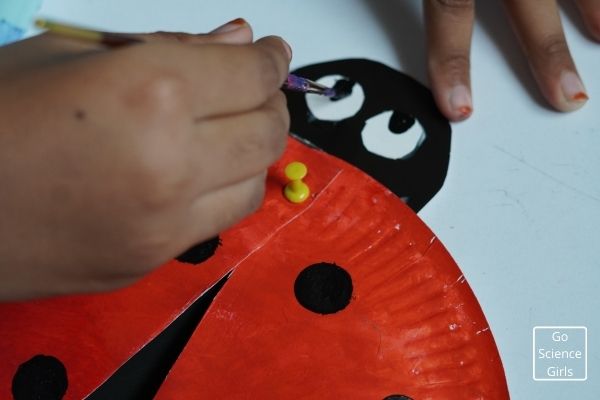
The second step is to cut the orange colored body part in to two equal halves as shown in the figure. You can tell your children to do this step on their own but only if they are old enough to manage scissors. It is easy for them to cut the paper if it is bent and cut. Next, ask them again to decorate the two halves of body part by giving black colored dots. They can add as many as they want according to the size of the body part but they shouldn’t located closely. Have an idea seeing the pictures attached.
Step-3: Let us create Googly eyes and Face Part
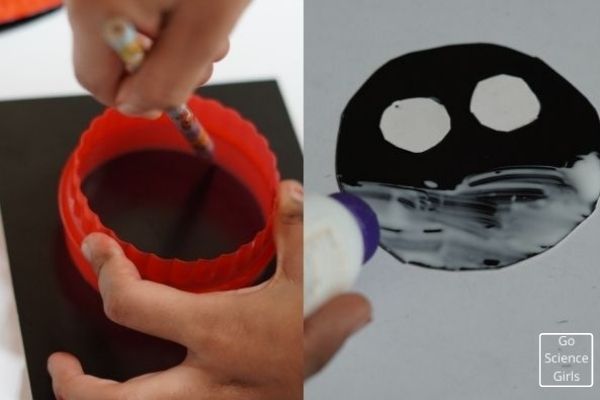
Now tell your child to cut out the black paper into circle shaped. Adults can help them out by arranging a bangle or any round shaped object to the children in order to trace the correct round shape. Then, give two small eyes on the black round shaped paper. You can paint white color or simply paste the round shaped white papers. Make sure the top end of the circle shape consists of eyes. Because the rest of the circle part is for attaching it to the body.
Step-4: Attaching Black head to the Base Body Part
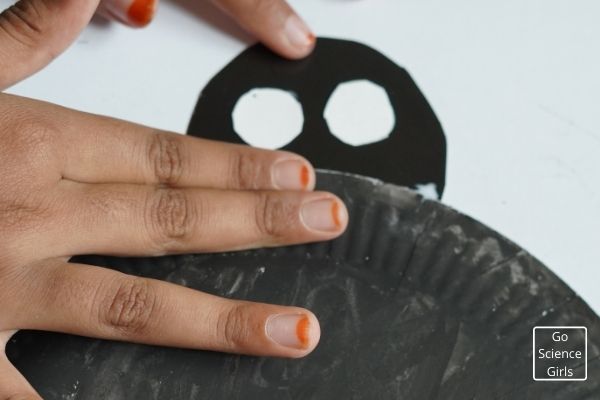
Attach the black head part to the orange body part using glue! Firstly, glue the rest half of the black head and attach it to the one end of black paper plate. Here we are using black paper as the base part to the body. Always see the pictures to clear out any confusion while building the model.
Step5: Glue the Lady Bug Body to the Base part
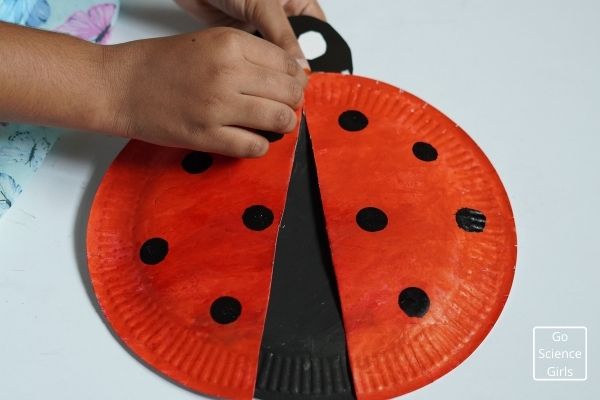
Moving on to the next step, glue the two decorative halves of body part at the point where black head and base attached. Use two paper fasteners to attach the two halves of body part. Here, remember to keep some distance between the two halves while attaching. Finally, after you attach the two halves the body looks like it is of three parts. One part is with decorative orange body part having black dots followed by black plain body and ends with another half part of decorative body part.
Step-6: Give Antenna and Eye Balls
It is time to give some antennas to this little and cute tiny creature. Using your color choice of pipe cleaners, make two antenna in the shape of moustache same as we commonly see to all the insects. Glue the two antenna and attach them with half centimetre distance at the front and down side part of the black head. Also, give two little eye balls to the white colored eyes using black paint. You can also use readymade googly eyes (your wish).
Step-7: Give six legs to the Body
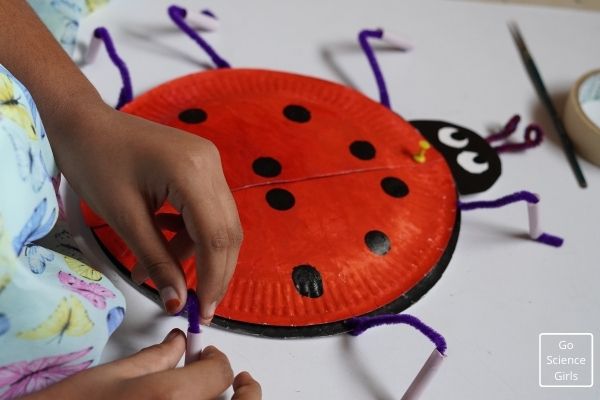
Let us give some movement to our tiny creature by arranging six legs to its body. That means we are going to give wings to it! Ask your child to cut all the pipe cleaners in to half or 3 parts depending on the length of the pipe cleaner you took. Using these pipe cleaners tell the kids to make six legs by folding them in the shape of ‘S’. Such that the kids will get the exact shape of legs. Now, ask them to glue all the six legs to the below part of the body. Remember to follow this order to give appropriate shape to your model same as real ones: Two legs are at either side of the black head, the other two at the middle part of the body on both sides and the rest at the either end parts of the body.

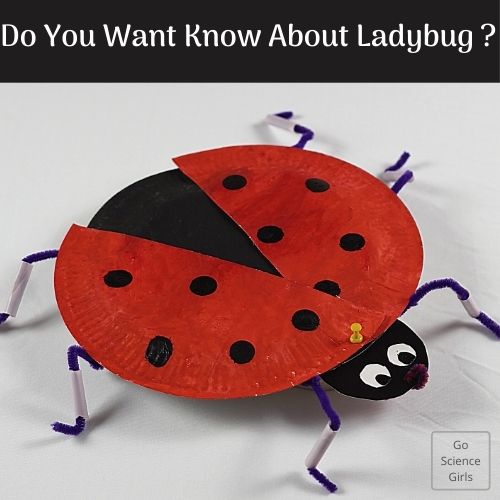
That’s it! The beautiful 3D Lady Bug Model is ready for your next science fair events.
Questions to discuss with children while constructing 3D Model of Lady Bug
3D Lady Bug Model offers a wonderful time to have discussions with your children about science. Here are the ideas and questions to talk about:
- Discuss about what are insects!
- Discuss about classification of insects!
- Tell about the life cycle of lady bug!
- Tell them how they react to humans!
- How lady bug do move, feed, smell and taste?
- What is the ideal environment for insects to grow?
- How the wings of lady bug help them to fly?
- In what way the lady bugs protect themselves from predators?
- How they become the natural enemies for other insects?
Clay Model Life Cycle of Lady Bug
We have discussed on how to make paper 3D model of lady bug. Next we are going to learn about the life cycle of lady bug! Making a clay model life cycle of lady bug is a fun and educational way to learn about lady bug life cycle. Let us see how we can do clay model lady bug life cycle.
Instructions to make Clay Model Lady Bug Life Cycle
Children learn a lot about different phases of lady bug life cycle hands-on way in this fun play. So, gather the following supplies to do the classic clay model of lady bug life cycle.
- Red, orange, black, green, and yellow colored clay or play dough
- Googly Eyes (you can find in art and craft shops)
- Black Pipe Cleaners
- Tiny Black buttons
You can also skip all the supplies except the clay because children can do whole activity using only clay.
Simple Instructions to follow
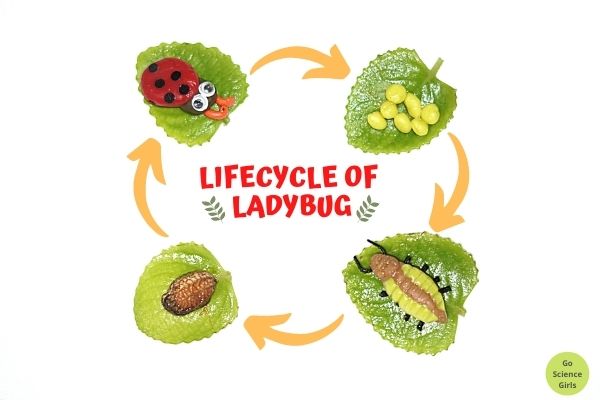
Firstly, discuss with your children about different stages of lady bug life cycle. Generally, the life cycle of lady bug consists of four stages. The four stages include: Egg, Larva, Pupa, and Adult Lady Bug. So, tell them about the names of the stages and explain briefly about each stage.
Then give out the reference cards of four stages of lady bug life cycle to the children. And ask them to make clay or play dough models of each stage. Or simply you can ask them to see the pictures attached in this post on lady bug life cycle.
Stage-1: To show the first stage i.e. embryonic stage, guide your child to make a leaf shape structure using green clay. And use to give yellow color clay to shape tiny eggs in cluster.
Stage-2: In order to represent larva stage, make a tiny alligator using yellow, orange, and black clay. And place it on the green color leaf clay structure.
Stage-3: Coming to pupa stage, use orange color clay to make a soft oval shaped body with black colored spots.
Stage-4: As a final stage, make a tiny adult tiny lady bug in red, black color. Place tiny googly eyes on the head part to give its complete structure and shape.
That’s it! It is so easy and simple to make clay model lady bug life cycle. Your children can use this clay model for their science fair events.
Four Stages of Life Cycle of Lady Bug
Lady bug life cycle seems similar to that of silkworm life cycle! Yes, lady bug fit in the Coccinellidae family and undergo whole transformation in four different stages to complete its full life cycle. Let us discuss briefly about all four stages:
Embryonic Stage
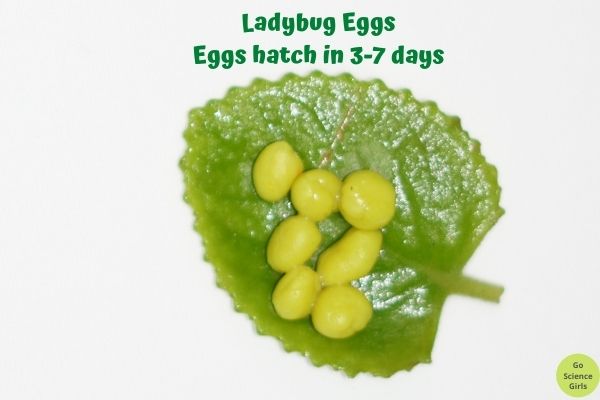
Embryonic stage is otherwise known as eggs! A female lady bug starts the first stage of life cycle by laying eggs in large number. Generally, they lay yellow colored eggs in large groups below the leaf surface or stem after mating. The interesting point of female lady bugs is: they lay eggs in the place which is filled with aphids in large amounts. Because they want to arrange food for their off spring to feed after hatching. It takes 6-7 days for an egg to hatch.
Larval Stage
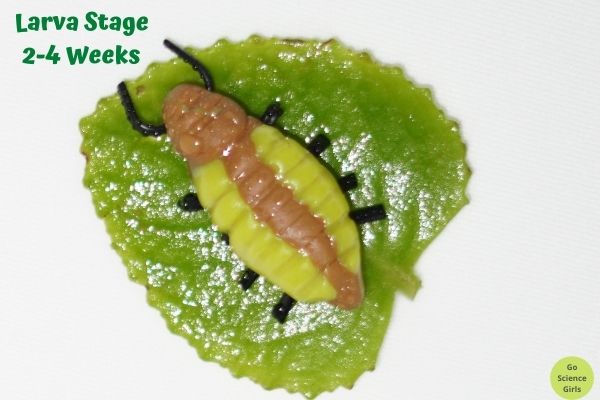
After a week, the eggs hatch into larval stage. In this stage, the larva looks like tiny alligator and start feeding on tiny insects, aphids, and other tiny worms. The larva sometimes feeds on a range of ova including the unproductive eggs laid by the female lady bug. Hence, horticulturists think that the larva stage is the helpful predator in the kitchen garden. The outward look characteristics of larva are black colored acnes, rough exoskeletons with extended figures.
Coming to the food habits of larvae: a single larva feed on around 500 aphids and within 14 days it grows completely. Before entering into pupating stage, the larva sheds over four instars. An instar is a period happening between two successive moults. And until the larva grows completely, the feeding process continues to develop a spineless cuticle around itself. When the times comes to pupate, the completely grown larva attaches to any surface or foliage of the plant in order to undergo transformation.
Pupa Stage
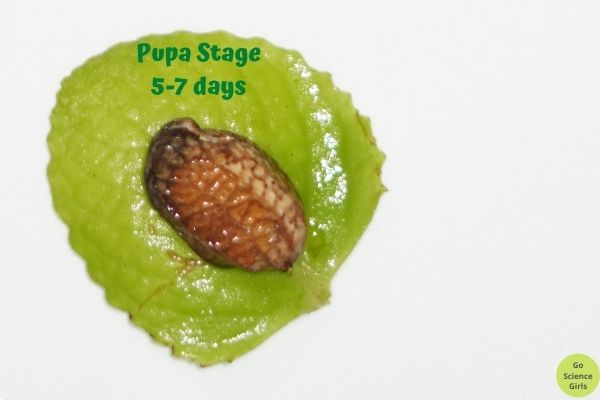
The pupal stage is also known as pupae where the lady bug appears in yellow and orange color with decorative black spots. This is the motionless stage, in which the lady bug do great transformations using histoblasts. Histoblasts are the distinctive cells that help in the metamorphosis by regulating the bio-chemical practice of giving birth to adult lady bug. Usually, a single lady bug takes 7-14 days to complete this stage.
Imaginal Stage
This is the final stage of lady bug life cycle happens when pupa completes its whole transformation into an adult lady bug. The completely grown adult lady bug comes out of the pupa but the outer part still looks soft and in light color. It takes 2-3 hours to harden its shell, to achieve its pigment, and to turn completely to its actual color and shape. The freshly arose adult lady bugs are called as imagos. These imagos feed on tiny insects and worms just like larva does.
Usually, the whole life cycle of lady bug happens around 5-8 weeks.

Discover the cluster of Lady Bug Eggs and Larva
Mostly, teacher’s raise lady bug farms in the school garden or within the classroom to show students the lady bug life cycle. Otherwise, ask your children to explore the plants in your garden. Because during winter months lady bugs hide away in order to protect themselves from extreme cold temperatures. Therefore, check all the plant leaves, stems, logs, etc. in your garden to find these in large amounts. As they do not fly and stick to the surfaces, children can have a great time to witness large masses of lady bugs. Until they warm up and are able to fly they do not even feel hungry and mate.
Spring is the ideal time for lady bugs to warm up and once they warm up, feeding on other insects starts. Once they start feeding, they also get enough energy to mate. They mate and lay eggs and begin the life cycle freshly.
If you love lady bugs, you can raise lady bugs farm to show your children the life cycle in real life.
Check Dr. Universe page to understand how ladybugs survive the winter.
FAQ’S
There are many easy ways to traplady bugs in your garden. Here are some ideas:
1) Make a sugar syrup and place it near the plants where aphids present in bulk number.
2) Take a coke bottle and cut off the head and tail part. Such that it looks hollow and cylindrical in shape. Now place a jam or sweet fruit pieces inside it.
3) Find the favourable food of lady bugs like tiny insects, worms, and even some variety of eggs. Then, place these food varieties at the places where lady bugs are available. You can use some sticky substance to trap lady bugs when arrived for feeding.
Either of these ways help amazingly to trap lady bug flies.
Lady Bugs are allergic to citrus compounds and solutions made of water and white vinegar. If you do not love and want to get rid of lady bugs in your garden, use cleaners and sprays made of citrus compounds and vinegar solutions. These sprays control the natural pheromone of lady bugs and helps in get rid of evolution of lady bugs.
Absolutely not! Yes, lady bugscan only harm humans by biting and causing red bumps on the skin. That is what all they can do and these bites are not harmful or deadly.
They cannot suck blood and transmit other diseases (which causes by parasite transfer). But the red bumps caused by lady bugs bite are painful and itchy for 2-3 days.
There are plenty of ways to make lady bugs get attracted to! Here are the ideas and interests of lady bugs listed below.
1) Lady bugs are attracted to tiny worms, insects, and eggs of other microbes.
2) A variety of eggs and even the infertile eggs of lady bugs are also the great food for them.
3) Lady bugs are much fond of pollen grains. So you can grow a variety of plants in your garden to make them get attracted to.
4) In addition, angelica, cilantro, fennel, yarrow, scented geraniums, caraway, tansy, coreopsis, and dill are the rich sources to attract lady bugs in large numbers.
No! Orange lady bugs are not harmful and poisonous to humans but they are poisonous to the pets and small animals who feed on them. Most of the orange lady bugs belong to Asian countries and are less predatory when compared to red tinted lady Bugs.
Lady Bugs are generally attracted to colors while finding ways to keep themselves warmer and hunting for food and water. Light colors are very much attractive for lady bugs while hunting food whereas darker colors are suitable for hibernating.
In addition, darker places are also useful for getting accommodation and warmth during extreme cold winter months. Among light colors, white colored things like flowers, stems, etc. is the pleasing color for lady bugs.
Lady Bugs like light colors so obviously they prefer to locate in sun. But not always they prefer to stay in light color places like white house walls, flowers, stems, etc. They do like shaded regions especially during winter months to avoid extreme cold temperatures. However, mostly lady bugs prefer to stay in light color regions because they cannot see in darker shades.
Lady Bugs lay eggs in large number and these eggs hatch to produce larvae. And these females do not lay fertile eggs all the time, they do lay infertile eggs along with fertile eggs. Infertile eggs are the eggs which do not contain embryo to fertilise.
The lady bugs in larvae stage start feeding on tiny insects, worms, and a variety of eggs as soon as they come out. Sometimes, they also feed on the infertile eggs laid by the female lady bug. Even the tiny babies that come out of pupa after metamorphosis feed on these infertile lady bug eggs.
Lady Bugs are not at all poisonous to humans but they do little harm by biting and leave red bumps on the skin. These red bumps cause irritation, little swelling, and pain for a few days. But these are very harmful and poisonous to pets when they feed on these lady bugs.
Lady bugs are also harmful to tiny aphids and tiny insects as predators. Pine lady bugs are the bugs in black color with red spots on it. These are very dangerous because of its toxicity. So, these bugs bite, you can see mild to severe allergic reactions on the skin.
Humans are free of diseases when concerned to lady bug bites. Because these little insects just do bite but do not feed on blood of humans. So, humans are completely safe and no need to worry about their health when come in contact with lady bug bites. However, they themselves suffer from a disease, STI-like fungal infection which is an infection and do transfer from one lady bug to other while mating.
