Let’s introduce kids to rocket science in a fun way. It is exciting right! I am also evenly excited to tell you about ‘DIY Paper Cup Rockets’ science activity. Let us begin!

Paper Cup Rockets activity works as a wonderful science fair project for your child’s science fair events.
How to Make Paper Cup Rocket

Materials required to make your own Space Rockets
Help your child to prepare their own space rockets at home using the below list of simple supplies. Here we go:
- Two Paper Cups
- Construction Paper or any kind of thick paper suitable for crafts would do
- Glue
- Scissors
- Markers or Sketches or Crayons or Water Paints
- Ruler
- Felt Tape
- Two or Three Elastic Bands
- Needle
*Product Links are affiliate links – Your support is highly appreciated
That’s it! Collect all the above supplies on your work table and get ready for the creating DIY rocket launchers.
You might be interested to checkout Making Balloon Rocket
Step by Step Instructions to Make DIY Rocket Launcher
Step-1: Prepare some decorative stuff for your Rocket
Pick different colored construction papers of your choice. We used blue, yellow, and red colored construction papers to prepare decorative stuff.

Firstly, make stencils of a crown and a wing shape using white paper and sketches. Then, use these stencils to create wings and crown decorative stuff with construction paper. By now, you are having two wings in blue color and a yellow colored crown shapes in your hand. You can decorate the stuff using black sketch by drawing lines as shown in the pictures.
You can choose to draw Cat, Mouse or even space ship to suit your kid’s interest.
Step-2: Preparing Rocket
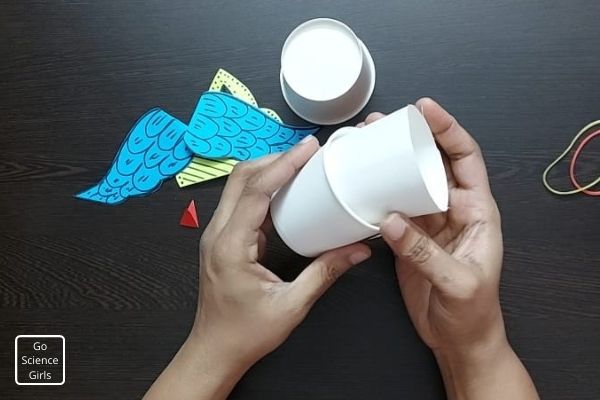
We need a strong rocket so I am going to layer it up with another cup.
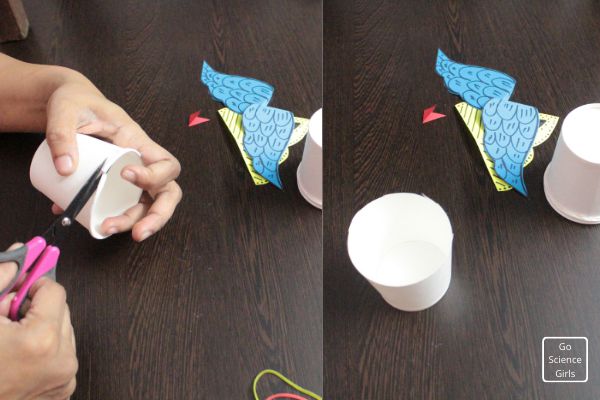
Just cut the edge of the cup and insert it in another cup to make two layers.
Take a paper cup and put two holes by inserting a needle one point of the cups side to the opposite side of the cup. Such that the two holes remain quite opposite to each other.

Make sure you are keeping these holes near the brim of the paper cup mouth area. Repeat the same process of making hole on the other side of the cup. That means you are making four holes on the four sides of the paper cup.
Step-3: Inserting Bands

Now pick two rubber bands and cut them at one point. Then, insert the line of rubber band into any two holes in opposite sides of the cup and tie its end part to keep a knot on both ends. Such that the inserted band will not slip out of the holes.
Repeat the same with the other line of band and keep tight knots into the other set of holes around the cup. Finally, after tying bands to the holes of the cup, you can see plus shape at the open side of paper cup mouth brim.
Step-4: Glue the Decorative Stuff

It is time to decorate our rocket launcher! Keep the paper cup which is referring to the rocket part, upside down. And glue the decorative stuff i.e. wings and crown to the same cup. That means two wings on either side of the cup and crown placed on the top of it.
Step-5: Give Face Shape to the Rocket

Now give your rocket a face by drawing two eyes using black sketch or marker. And then a nose part by cutting red color construction paper in the shape of a triangle. Glue the nose part to the face of rocket just below the eyes area as shown in the picture. That’s it! Your space rocket is ready to fly.
Step-6: Flying Paper Cup Rocket
In this step, pick another paper cup and place it in reverse position such that the paper cup is in upside position. We are going to use this inverse paper cup as a base part or launcher for your space rocket.

Now place your rocket on top of the base cup but in upside down position. Make sure the base is also in inverse position. Then, give a gentle pressure just with the bear hands and push the rocket towards the base. After pushing it over the base part, release the pressure on the rocket part.
Observe how your rocket is flying amazingly into the air! Again get your rocket back on top of the launcher and let the rocket go and fly! Hope it is easy for you as well to prepare your own rocket at home using simple supplies.
Science behind How Paper Cup Rocket Fly
There are four significant forces that works for the process of rocket functioning. These forces include pressurized air, thrust, weight, and lift. And of course, it all based on the Newton’s laws of motion as well.

What Newton’s Third Law of Motion says? It says; “every action has an equal and opposite reaction”. Satisfying the newton’s third law, the rocket part when you push downwards over the base part and release, it flies into the air. That means the amount of pressure you give on the rocket makes it fly with the same amount of energy and force upwards after releasing the pressure. The pressurised air accumulated inside the rocket cup travels straight down when released while pushing the rocket upwards. This is what newton’s third law explains and the forces acting upon rocket from downwards also plays major role in making rocket to fly.
Here are few fun activities that you can do with kids based on Newton’s Third Law of Motion:
Hope you all enjoyed and explored a lot about rocket science and DIY Paper Cup Rockets. Happy crafting and experimenting!
